Disclaimer: This post may contain affiliate links, meaning we get a small commission if you make a purchase through our link at no extra cost to you. For more information, please visit our Disclaimer Page.
You can spice up your blog with some amazing features. I’m going to share with you the top 10 best WordPress plugin for new bloggers.
Before I do that though, what exactly is a WordPress plugin?
Well, Plugins are software that you add to your website to enhance its functionality. Plugins add features as well as allows you to optimize your blog and customize it.
Whatever you need, there is a plugin for it. However, as a newbie blogger, you don’t want plugins for everything.
Having too many unnecessary plugins only makes your site run and load more slowly. Google will have a hard time optimizing your content for SEO if it doesn’t load fast enough because it will too long for it crawled and indexed.
You don’t need a lot of plugins to build a successful blog, but some are a must-have.
Here are the ten best WordPress plugins.
Table of Contents
Contact Form 7
Contact Form 7 is the simplest contact form I’ve seen. This form can be added easily to pages, post instantly.
After installing Contact Form 7, in the WordPress admin area, you’ll see an option contact. You can create and edit the forms.
Once you’ve activated the plugin, copy the form shortcode and paste it into a post or page, and “Whoop Whoop!
There goes the contact; users of your website will be able to send you a message to your email.
RankMath
RankMath helps with writing SEO-friendly content and increases your chance of ranking higher in search engines.
Rank Math fundamentally helps you with optimizing your content for search engines and outranking your competitors.
It outlines how to structure your content by choosing a focus keyword while you’re writing your posts. It even gives you a guide as to how and where to assign the keywords.
Grow by Mediavine
The Best Looking Social Sharing Buttons
Grow by Mediavine is one of the easiest social sharing plugin available to use.
You can customize social share buttons that will integrate beautifully with your website’s design.
You can get more interactions and social media shares.
It gets even better because with just the free version, you get to access to Facebook, Twitter, Google+, Pinterest, and LinkedIn.
You can place the social share buttons either right before your content or after your content or even both.
You can have Floating Sidebar Social Share Buttons, so where ever the use go on your blog, the social share buttons will follow the user as he/she scrolls up and down your webpage by adding floating buttons on the left or right side of the screen.
It displays social share counts for all social media networks.
Link Checker Plugin
The Link Checker for WordPress makes life easier for you to find any broken links on your blog and then clean them all up.
It does prove useful and helpful in terms of keeping your blog healthy.
Link Checker uses an external system to crawl your website a d detect broken links and images as it finds them.
Wp-Smushit
Wp-Smushit allows for smooth compressing of images without losing quality. Images are essential to boost your site’s engagement. Quite many beginners to blogging make the mistake of using large images. Images that are too large affect their website performance and cause readers to leave their site because the website loads very slowly, and they get frustrated.
Based on that, you need a plugin that compresses your images plugin like WP Smush to not only resize but optimize your images for speed automatically. Simply install the plugin, go to Media > WP Smush, and click “Bulk Smush Now.”
You can set WP Smush to automatically optimize new images when you upload them without losing quality. Go to settings and choose “Automatically smush my images on upload.” Once you do that, you don’t have to worry about images slowing down your website again.
Cookie notice by dFactory
Cookie notice by factory allows you to elegantly show a message telling visitors that your website uses a cookie.
As required by GDPR, If your website uses a cookie, you are required to notify people who visit your website.
Cookie notice pops up elegantly by showing a simple message as soon as someone visits your website or blog.
Here are a few features :
- You can customize your cookie message.
- Users can be redirected to specific pages for more cookie information.
- It links to the Privacy Policy page.
- Decide where the cookie message goes. the position of the cookie message box
Easy table of contents
Easy Table of Content applies a table of contents into your pages that are userfriendly.
You can customize it, and it automatically inserts a table of contents to all your posts and pages once you activate it. You have the option to apply to posts only if you want to.
The benefit of having this plugin is that it. When you Adding a table of contents to your blog posts can be good for SEO.
Pretty links
Pretty Links allows you to shorten links using your domain name.
It shows how many people have accessed the affiliate URL. It gives a detailed report about the source of the click.
Pretty Links works fantastic, especially you want to go in affiliate marketing, and you don’t want users to see your affiliate links.
UpdraftPlus
UpdraftPlus backs up your website information and allows you to restore it. You have multiple external storage options that you can choose.
The truth is, as with anything, things may go wrong at any time. For sanity, for ease of doing everything from scratch, it is recommended to back up your website, so if anything happens, you can go back to your back up files.
You want to protect against hacking, website crashes, and security flaws.
Backups should never be neglected.
The backup stays there as long as you want. This plugin has over 2 million active users and is the most user-friendly scheduled back plugin.
iThemes Security
The iThemes Security plugin (previously known as Better WP Security) is one of the more impressive ways to protect your website, with over 30 offerings to prevent things like hacks and unwanted intruders. It has a strong focus on recognizing plugin vulnerabilities, obsolete software, and weak passwords.
Here are a few features included in the free version:
- With one-click security, you can set what security level you want for your site. For example, WordPress blog owners who are under heavy attack can set their one-click security level to “Critical.”
- Here you can set your notification options. I usually set it for a few scenarios like “Alert on a critical problem,” “Alert on warnings,” and “Alert when an admin user signs in.”
- If you use any login security plugin, you can get rid of it! WordFence can be configured to send you notifications for any user who logs into your WordPress dashboard and can issue lock-outs from logging in after (x) failed login attempts.
- Another useful feature here is it won’t reveal valid usernames in the login error.
How to install a plugin in WordPress:
You can install plugins on your WordPress website in two ways.
- You can use install it after you search the plugin search tool.
- You can upload it directly to WordPress
Searching for a plugin through the plugin search tool is far more manageable.
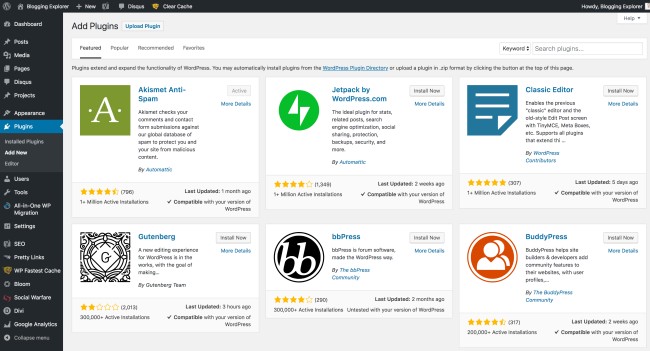
How do you install a plugin from the WordPress plugin directory:
Firstly, go to your WordPress admin area. Search for plugins in the left menu on the left-hand side, click on “Plugins, then select Add New.”
From there, you will be taken straight to the WordPress plugin directory. Type the name of the plugin you want to install in the keyword search area
For you to install a plugin you need, click the “Install Now” button.
Don’t leave the page until the installation is completed.
After the installation is finished, click activate.
Some plugins are not in the directory, so you have to upload it manually.
How to upload a plugin manually to WordPress:
To use this method, you first need to download the plugin from either you bought it, or it was given you a free resource.
When you download the file, it will come in a ZIP folder, don’t unzip it. It has to be in a ZIP folder to upload it to WordPress.
Go to WordPress dashboard, click on“Plugins > Add New”. You’re going to click on the “Upload Plugin.”
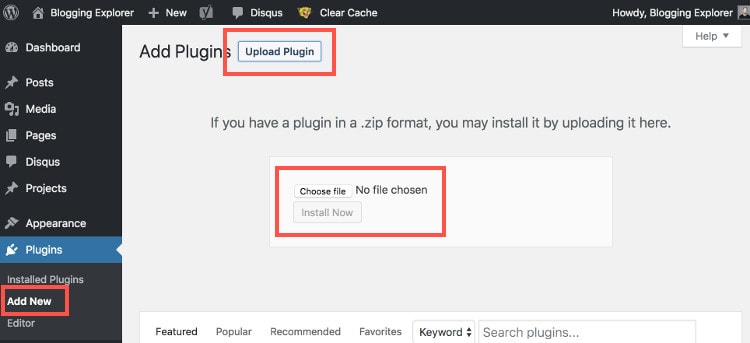
Click “Choose file” and add the plugin ZIP file you downloaded. Click the “Install Now” t button which will start the installation.
Boom!
You’ve installed the plugin, activate it, and you’re good to go.
You’re all set!
Here are a couple of related articles you may want to read, too:
So what do you think of the plugins I’ve listed above?
This list of 10 plugins that will take your blog from good to great?
Liked this post? Feel free to like, share and comment.