Learn to start a blog today -

How to Start a WordPress blog in 2025
Disclaimer: This post may contain affiliate links, meaning we get a small commission if you make a purchase through our link at no extra cost to you. For more information, please visit our Disclaimer Page.
How to start a WordPress blog in 2025? If you’ve been thinking about launching your own blog, there’s no better time than now!
With the right guidance and tools, creating a WordPress blog is simple, whether you’re a beginner or an experienced user.
This Hostinger WordPress tutorial will walk you through each step, from choosing a domain name to installing WordPress and customizing your site.
By the end, you’ll have a professional, fully-functioning blog that’s ready to share your thoughts, ideas, or business with the world.
To kick off your WordPress blog on Hostinger, you’ll need two essential things:
- A topic you’re passionate about.
- A catchy blog name that resonates with you.
With those sorted, you’ll just need a straightforward guide to get your blog online.
In this post, I’ll provide you with easy-to-follow instructions!
I’ve designed this tutorial specifically for those just starting out. If the idea of creating a blog from scratch feels daunting, you’re not alone—I’ve been in your shoes before!
We’ll go over some technical details, but I’ll be with you every step of the way.
Why take my advice? Since 2019, I’ve been building WordPress blogs and websites full-time, which means I’ve spent countless hours mastering the craft.
Throughout this Hostinger tutorial, I’ll share my favorite tips and tools to ensure your blog starts off on the right foot. These are the same methods I use to create numerous successful websites each year.
By the time you finish this post, you’ll have everything set up for your blog to thrive.
Let’s get started on your WordPress journey with Hostinger.
Don’t forget to save this post for later!
Table of Contents
What Do You Need to Start a WordPress Blog?
Starting your WordPress blog is easier than you might think! Here are the three essentials you’ll need to get rolling:
- Blog Hosting: This is the service that keeps your blog files and data stored on the web. Think of it as your blog’s home on the internet.
- Domain Name: This is the address people will type in their browsers to find your blog. It should reflect your content and be easy to remember.
- WordPress Blogging Platform: This is the software that allows you to build and manage your blog. It’s user-friendly and packed with features to help you create amazing content.
What Is WordPress?
WordPress is a popular Content Management System (CMS) that simplifies building and managing websites. Think of it as the engine behind your site, allowing you to easily add content, customize your design, and publish your work online – no coding expertise required!
Initially designed for blogging, WordPress has evolved into a versatile platform used to create all types of websites, including:
One of the reasons WordPress is so widely used is that it’s open-source. This means its core software is free to use and modify, encouraging a large, active community that continually contributes to its development. Currently, WordPress powers around 43% of all websites on the internet – a testament to its popularity.
What Are the Benefits of Using WordPress?
WordPress is a powerful and flexible platform that gives you the tools to create the website you envision. Here are some of the key benefits:
- Complete Design Freedom
WordPress gives you full ownership and control over your website. Unlike website builders like Wix or Squarespace, which have design limitations, WordPress lets you customize every aspect of your site. - Monetization Opportunities
You can monetize your WordPress site in any way that suits you, whether through advertising, selling products, or creating membership plans. - Flexibility
WordPress is known for its extensive customization options. With thousands of free and premium themes (like Divi), you can create the exact look you want. Plus, must-have plugins like Rank Math and WP Rocket will ensure your site loads quickly and ranks higher in search engines. - Open-Source and Free
The core WordPress software is free to use and modify. While you’ll need to pay for web hosting and a domain name, there are affordable options available, such as Namecheap for domains and SiteGround for hosting. - SEO Friendly
WordPress is designed to be search engine-friendly, giving your site a better chance of ranking higher on search results. Plugins like AIOSEO (All In One SEO) further enhance your site’s SEO capabilities.
If these terms sound new to you, don’t worry! We’ll break everything down step by step.
This is the link your visitors will type in to explore everything you have to offer.
If you’re unsure about the perfect domain name to choose, no worries! You can register it later, giving you time to set up your blog hosting and focus on crafting great content.
How Does Blog Hosting Work?
When you sign up with a blog hosting provider, you’re essentially renting space on their web server. This allows your blog to be accessible to people worldwide, 24/7.
A “web server” is just a fancy term for a computer that makes your website available to everyone.
When it comes to selecting the right blog hosting service, keep these three essentials in mind:
- Easy, Reliable Technical Setup: You don’t want to waste hours navigating complex setups; your focus should be on blogging!
- Reliability: Your blog needs to be up and running 100% of the time, ensuring your readers can access your content whenever they want.
- Fast Page Loading Speed: The quicker your blog loads, the happier your visitors will be, which means they’re more likely to stick around.
All of these factors will help you save time and maximize your blog’s earning potential. When your WordPress blog runs smoothly, your visitors will engage more with your content, leading to increased conversions, greater income, and a loyal readership.
If you’re completely new to blogging, you might be wondering how to find the best blog hosting provider. Let me guide you through some helpful tips next!
Which Hosting Provider Should You Use in 2024?
With hundreds of blog hosting providers available, it can be overwhelming for beginners to choose the right one. I completely understand how daunting this can be.
To save you time and money, I’ve done the research for you. I’ve made my fair share of mistakes while searching for the ideal hosting for my blogs and websites, and some of those missteps cost me significantly, including lost clients.
Let me guide you through how to avoid technical troubles with your blog.
While you’re free to select any hosting provider that suits your needs, my recommendation is based on my personal experience and what has worked best for all my blogs and websites.
Why Hostinger is My #1 Recommendation for Blog Hosting and Domains:

Starting a blog is an exciting journey, and choosing the right hosting provider is crucial. Hostinger stands out for bloggers due to its affordability, performance, and ease of use. Here are the top reasons why Hostinger is the best hosting solution:
- One-Click WordPress Installation: Easily set up a professional blog in minutes with one-click installation.
- Affordable Pricing: Plans start at $2.99/month, with up to 75% off hostingdiscount for new bloggers.
- User-Friendly Interface: Intuitive control panel designed for beginners to manage websites effortlessly.
- Fast Loading Times: Optimized servers ensure quick load times, enhancing user experience and SEO rankings.
- 24/7 Customer Support: Reliable support team available around the clock to assist with technical issues.
- Free Domain Registration: Get a custom domain free for the first year with select plans..
1. Picking a Niche for Your WordPress blog
Choosing a niche is essential as it defines the specific topic your blog will focus on and determines your target audience. A well-defined blog niche not only helps you select the perfect blog name but also allows you to develop a cohesive blogging strategy.
Examples of blog niches include:
- Personal Finance: Tips on budgeting, saving, and investing.
- Health and Fitness: Workout routines, nutrition advice, and mental wellness.
- Parenting: Advice for new parents, educational activities, and family outings.
- DIY and Crafts: Creative projects, home improvement tips, and craft tutorials.
- Tech Reviews: Insights on gadgets, software, and industry trends.
While it might be tempting to cover a wide array of topics when starting your new blog, trying to master too many subjects can be overwhelming and unsustainable.
Select a Niche That Has Audience Potential
Gauge whether enough people are discussing your niche on social media and community forums.
Ensure your chosen topic has enough pre-existing interest to attract an audience.
Use tools like Google Trends to check the search volume of specific keywords related to your niche.
Stay Informed About Trends in Your Niche
By keeping up with what’s trending in your niche, you can identify blog post ideas that are likely to generate more engagement.
How to Start a WordPress Blog in Under 1 Hour on Hostinger
Ready to kickstart your blogging journey? This Hostinger WordPress tutorial is designed to get you up and running in just 30 minutes.
Don’t forget to save this tutorial for later and share it with friends who are looking to start their own blogs!
Step 1: Get Your Hostinger Hosting Account
- Start by clicking here to access the Hostinger website.
- Click on Get Started Now to begin your journey:
On the next page, select the premium plan on the left by clicking Select.

step 2. Choosing Blog Hosting and Domain Name
If you’re new to the blogging world or launching a website, you might be asking yourself:
What is blog hosting?
Think of a blog hosting provider as the landlord of your blog. They provide a virtual space where your blog can “live” and thrive online. Additionally, they help you secure a domain name for your site.
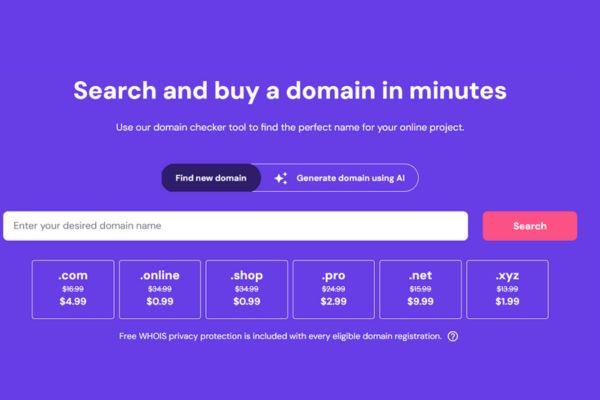
Your domain name is essentially your blog’s address on the web—the URL people enter into their browsers to access your content. For Dare Your Lifestyle, your domain name is:
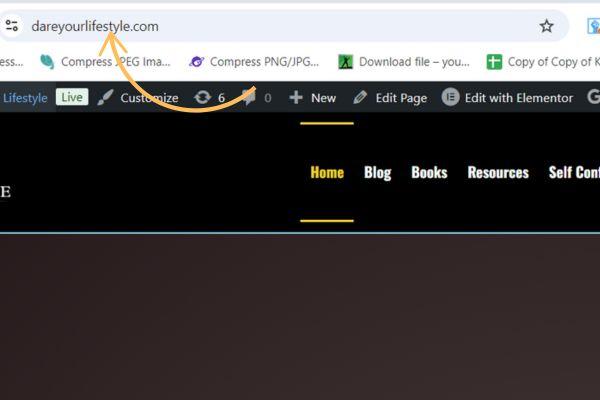
dareyourlifestyle.com
Next, secure your domain name, ideally matching your blog name. If unavailable, choose a similar option.
Here are two tips to help you avoid that:
- Keep it Simple: Choose a domain name that’s easy to pronounce, spell, and recall.
- Use a Domain Name Generator: If you’re stuck, tools like domain name generators can help you come up with creative, memorable, and relevant domain names.
step 3. Install WordPress Core on Hostinger
Setting up WordPress with Hostinger is quick and straightforward:
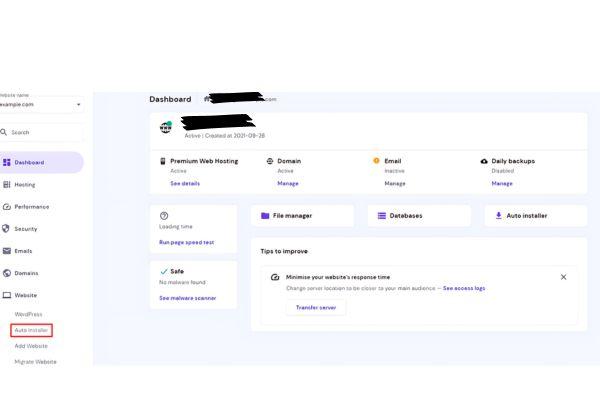
- Access Auto-Installer
- After logging into Hostinger’s dashboard, find the Auto-Installer option on the left sidebar and click it.
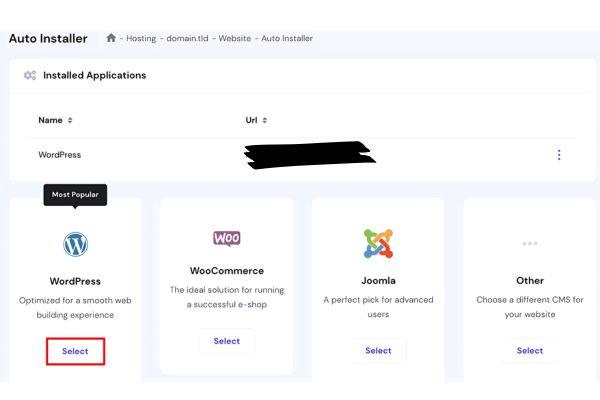
2. Select WordPress
Choose WordPress from the list and click Select to start the installation process.
3. Fill in the Required Information
4. Click Install
- After entering all the details, click Install, and WordPress will be set up in just a few minutes.
step 4. Choose and Activate a WordPress Theme
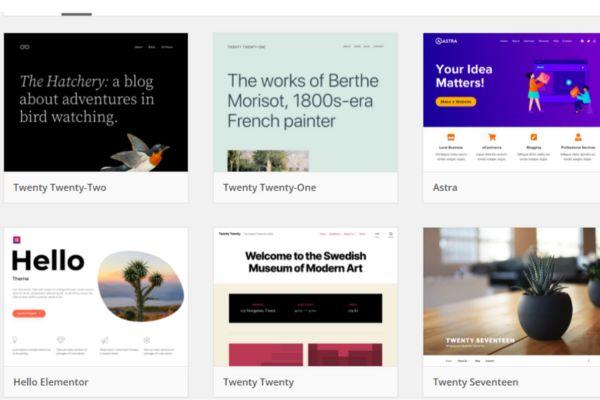
Now that WordPress is installed, it’s time to give your site its visual identity:
- One of the best and most user-friendly themes for WordPress is Blocksy—the theme I use on my blog. Blocksy offers powerful customization options, is easy to navigate, and even provides features for free that other themes typically charge for.
- Whether you’re building a blog, portfolio, or online store, Blocksy makes the process smooth, with its intuitive design and numerous layout options.
Once you’ve chosen and customized the Blocksy theme, activate it to bring your site to life and enjoy its premium-like features without the cost!
Step 5. Set Up and Customize Your Website
Once you launch your WordPress site, it’s time to choose and install plugins to enhance functionality. WordPress offers a wide range of plugins for various needs, including admin enhancements and website security.
Install Plugins to Customize Your Website
Once you’ve launched your WordPress site with Hostinger, installing plugins is essential for enhancing functionality and performance. Here are ten crucial plugins to consider:
- Rank Math: Boost your site’s chances of ranking high in search engines.
- Akismet: Blocks spam comments on your blog.
- Social Warfare: Makes your blog posts easily shareable on social media.
- UpdraftPlus: Regularly backs up your site to prevent data loss.
- Wordfence Security: Protects against hackers and malware.
- Google Analytics Integration for WordPress: Adds a widget to monitor visitor activity.
- W3 Total Cache: Improves site loading speed for returning visitors.
- Keyy Two Factor Authentication: Secures your site from unauthorized access.
- EWWW Image Optimizer: Ensures your images are optimized for faster loading.
- NitroPack: Keeps your WordPress site fast with caching and speed optimization features.
These plugins will help you create a secure, efficient, and user-friendly blog on Hostinger, ensuring you provide the best experience for your visitors.
These plugins are mostly free, with premium options available, making them ideal for starting your blog with Hostinger.
How to Install Plugins
Installing plugins on your WordPress site is easy. Just follow these steps:
- Navigate to the Plugins Section: Open your WordPress dashboard and find the Plugins section.
- Add a New Plugin: Click on the Add New button located at the top of the page.
- Search for Plugins: Enter the name or keyword of the plugin you want in the search bar. Click the Install Now button next to the desired plugin. If you have the plugin file ready, select Upload Plugin, choose the file from your computer, and click Install Now.
- Activate the Plugin: Once installed, click on Activate Plugin to turn it on.
Step 6: Create the Necessary Pages and Categories on WordPress
To build a successful blog, you need to create essential pages and categories that will organize your content effectively. Here’s a quick guide to get you started:
- Create Essential Pages:
- Home Page: This is the first impression visitors will have of your blog. It should summarize your content and showcase your best posts.
- About Page: Share your story, mission, and what readers can expect from your blog. This helps build a personal connection.
- Contact Page: Provide a way for readers to reach you. Include a contact form or your email address for inquiries.
- Privacy Policy Page: Required for legal compliance, this page explains how you handle visitors’ data and their privacy.
- Terms and Conditions Page: Outline the rules and guidelines for using your blog, which is especially important if you have a business component.
- Set Up Categories:
- Organize Your Content: Create categories that reflect the main topics of your blog. This makes it easier for readers to find what they’re interested in.
- Limit the Number: Start with a few broad categories, then expand as needed. Common categories include Lifestyle, Travel, Food, and Health.
- Use Descriptive Names: Choose category names that clearly describe the content, helping both users and search engines understand your blog’s focus.
- Add Subcategories (if needed):
- If your categories get too broad, consider adding subcategories for more specific topics. For example, under “Travel,” you might have “Travel Tips,” “Destinations,” and “Travel Gear.”
- Create Menu Links:
- Once your pages and categories are set up, add them to your site’s navigation menu for easy access. This improves user experience and keeps your blog organized.
By creating these essential pages and categories on WordPress, you’ll lay a solid foundation for your blog, making it user-friendly and easy to navigate.